> ## Documentation Index
> Fetch the complete documentation index at: https://docs.haitoken.ai/llms.txt
> Use this file to discover all available pages before exploring further.
# VS Code
> 通过 BYOK 将 VS Code Copilot Chat 接入 HaiToken
VS Code 支持通过内置的语言模型管理功能,为 Copilot Chat 添加自定义模型。配置完成后,你可以在 VS Code Chat 面板中直接使用 HaiToken 模型。
## 协议说明
VS Code 的自定义模型(Custom Endpoint)路径兼容 OpenAI Chat Completions 协议。本文档使用 Custom Endpoint 模式,API Type 选择 `chat-completions`,完整请求地址为 `https://api.haitoken.ai/v1/chat/completions`。
## 先准备好这些信息
* 已启用 GitHub Copilot 的 VS Code
* HaiToken API Key
* 至少一个可用模型 ID,例如 `gpt-5.4`
* HaiToken 完整请求地址:`https://api.haitoken.ai/v1/chat/completions`
## 接入步骤
### 步骤 1:打开语言模型管理界面
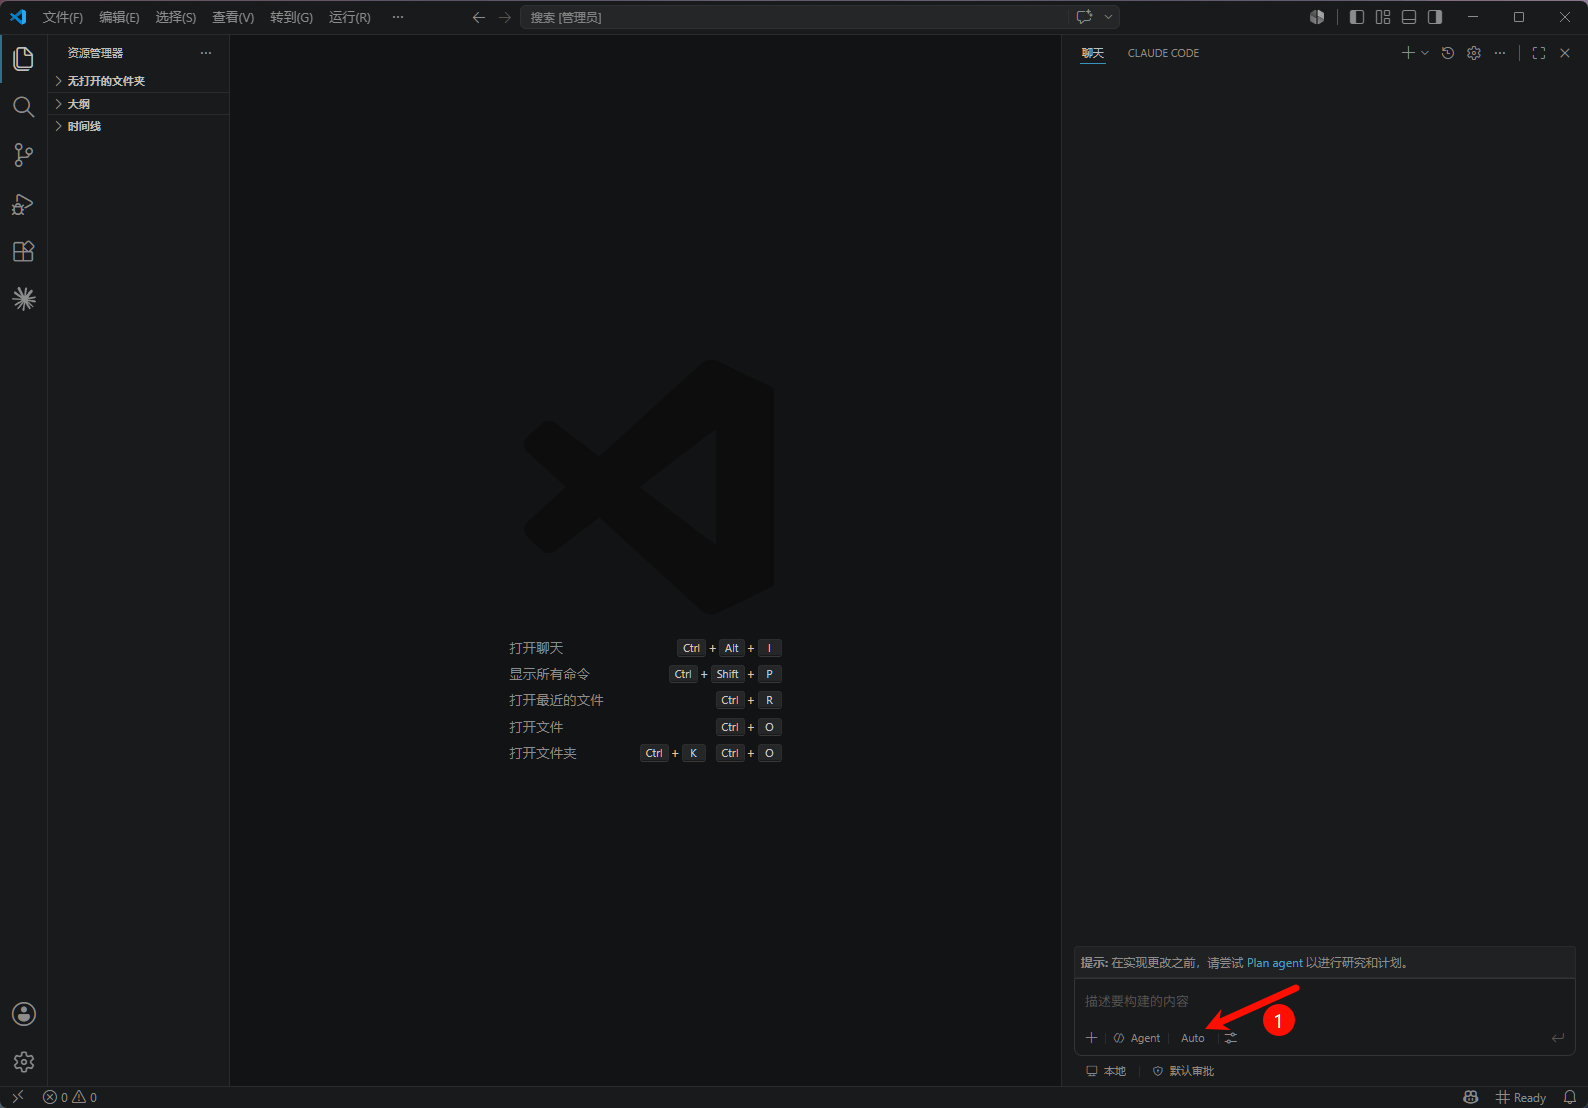
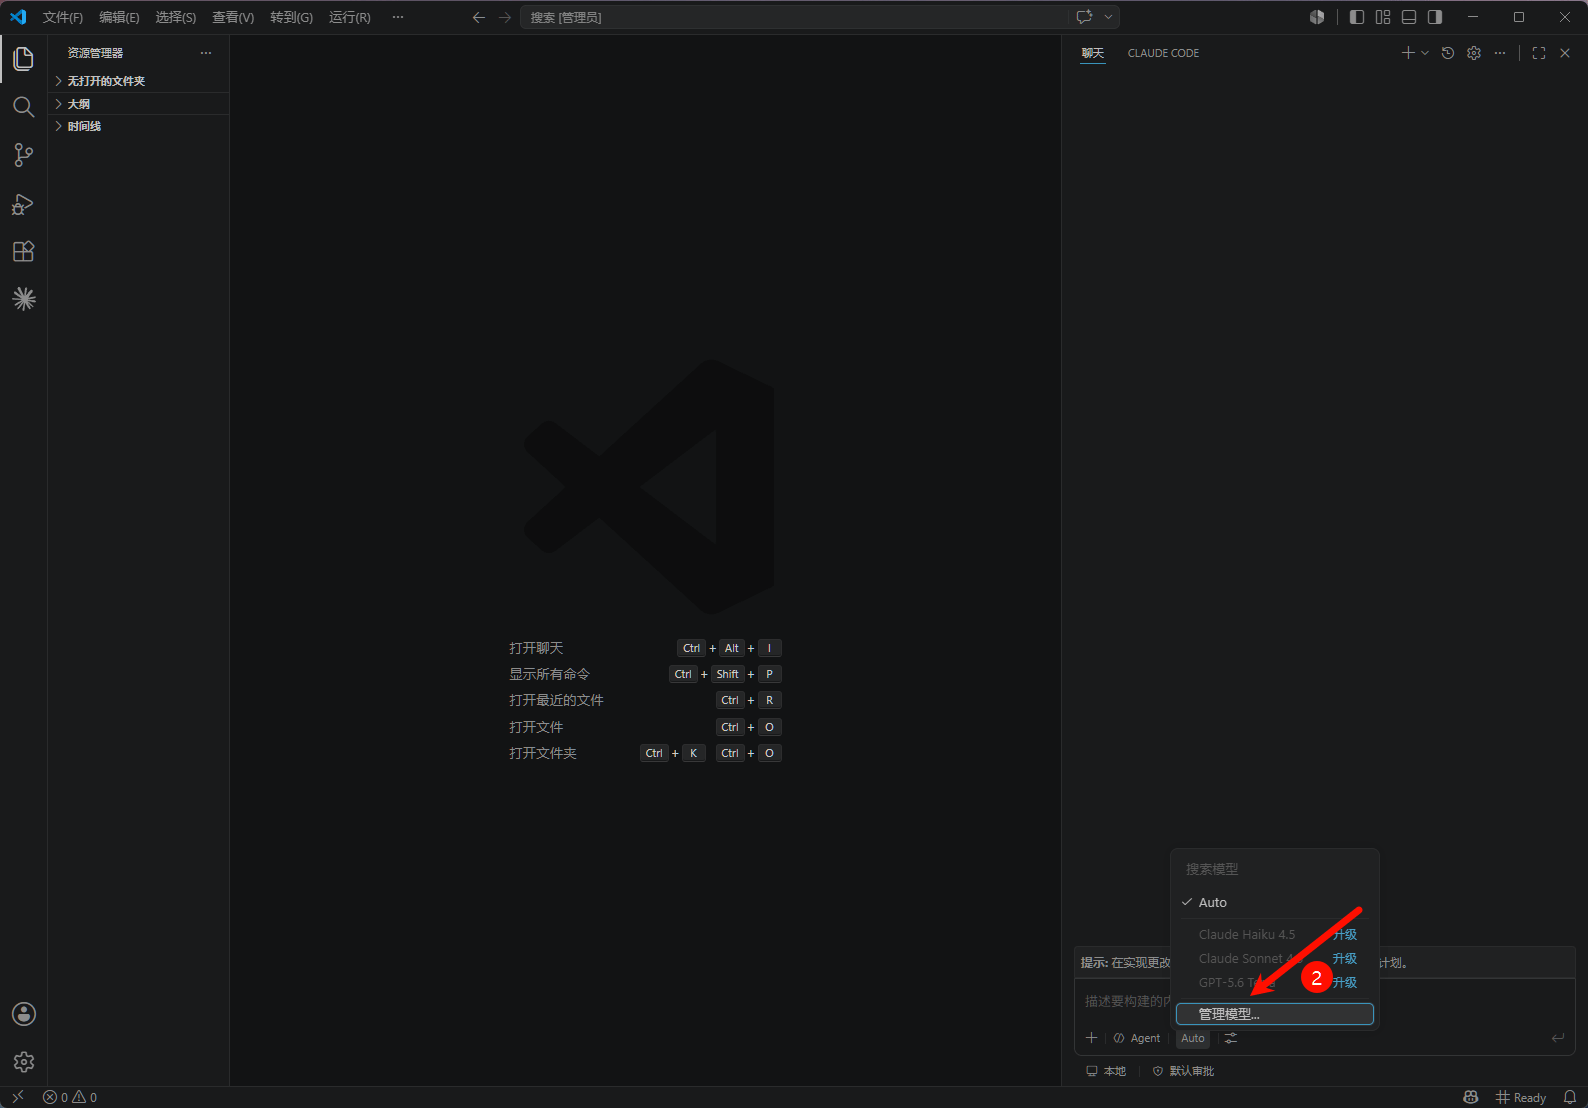
在 VS Code Chat 面板中,点击输入框旁的模型选择器(默认显示 Auto),在弹出的下拉菜单中选择「管理模型」。
也可以打开命令面板(`Ctrl+Shift+P` / `Cmd+Shift+P`)运行 **Chat: Manage Language Models**。
 ### 步骤 2:添加 Custom Endpoint 模型
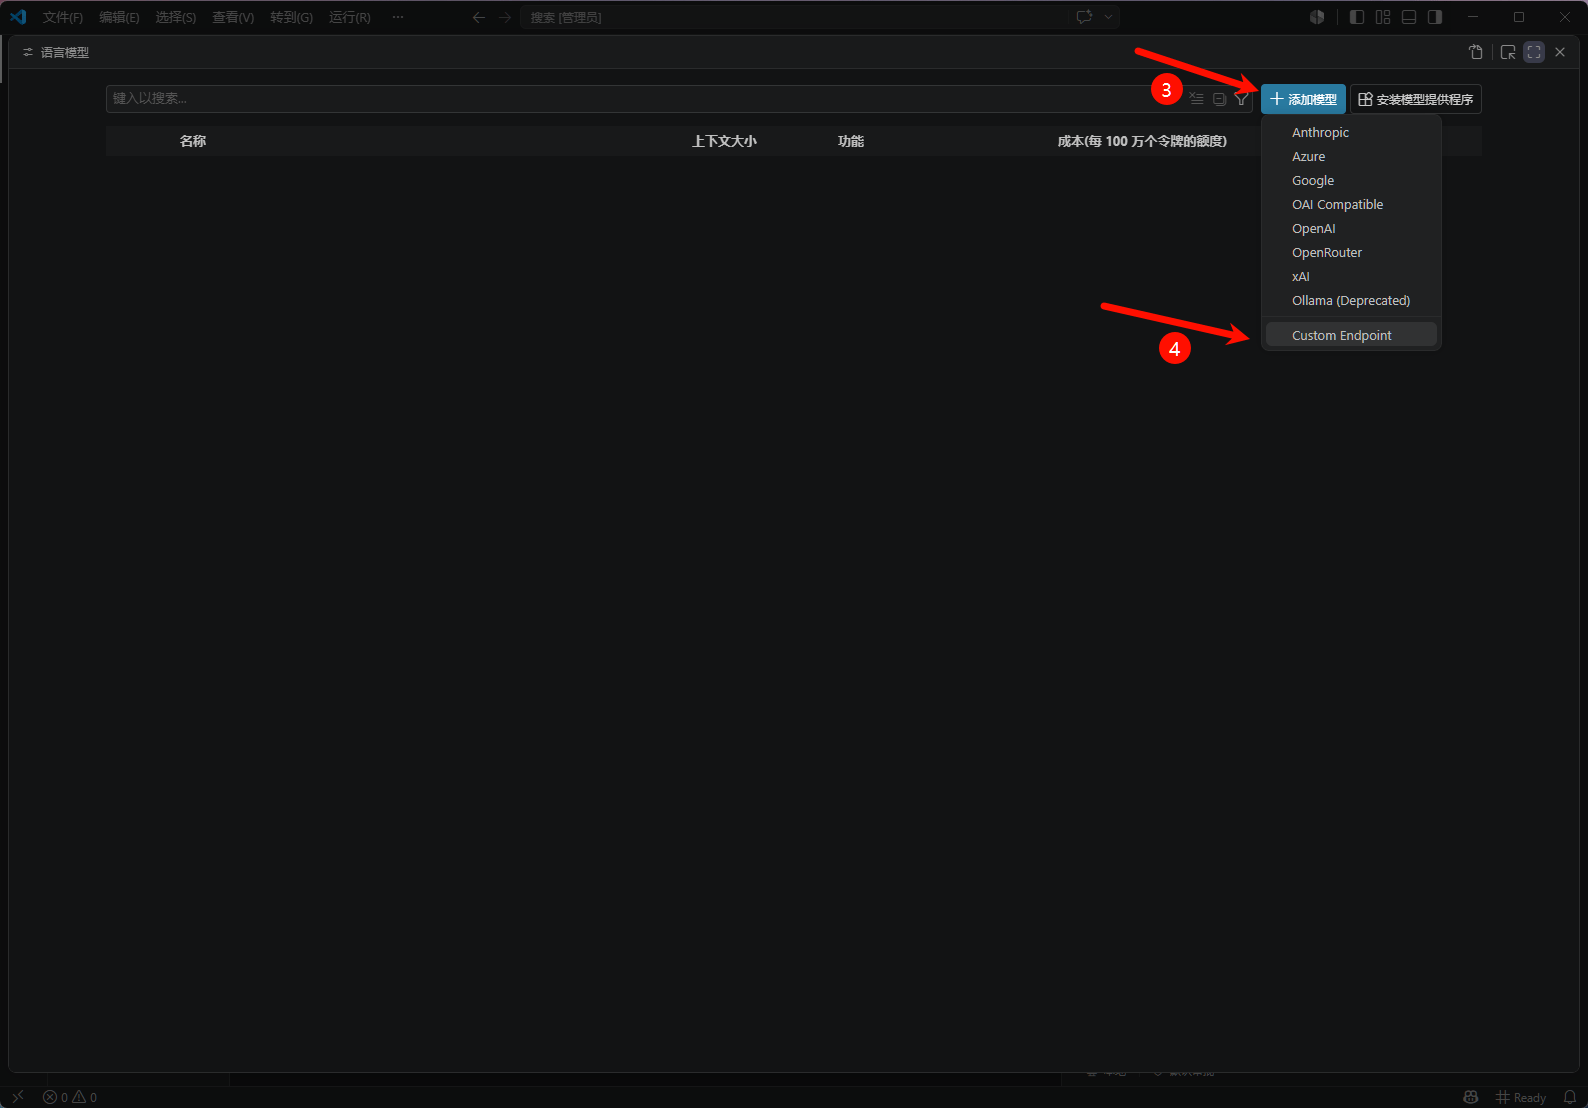
在「语言模型」管理页面,点击「添加模型」,从下拉菜单中选择 **Custom Endpoint**。
### 步骤 2:添加 Custom Endpoint 模型
在「语言模型」管理页面,点击「添加模型」,从下拉菜单中选择 **Custom Endpoint**。
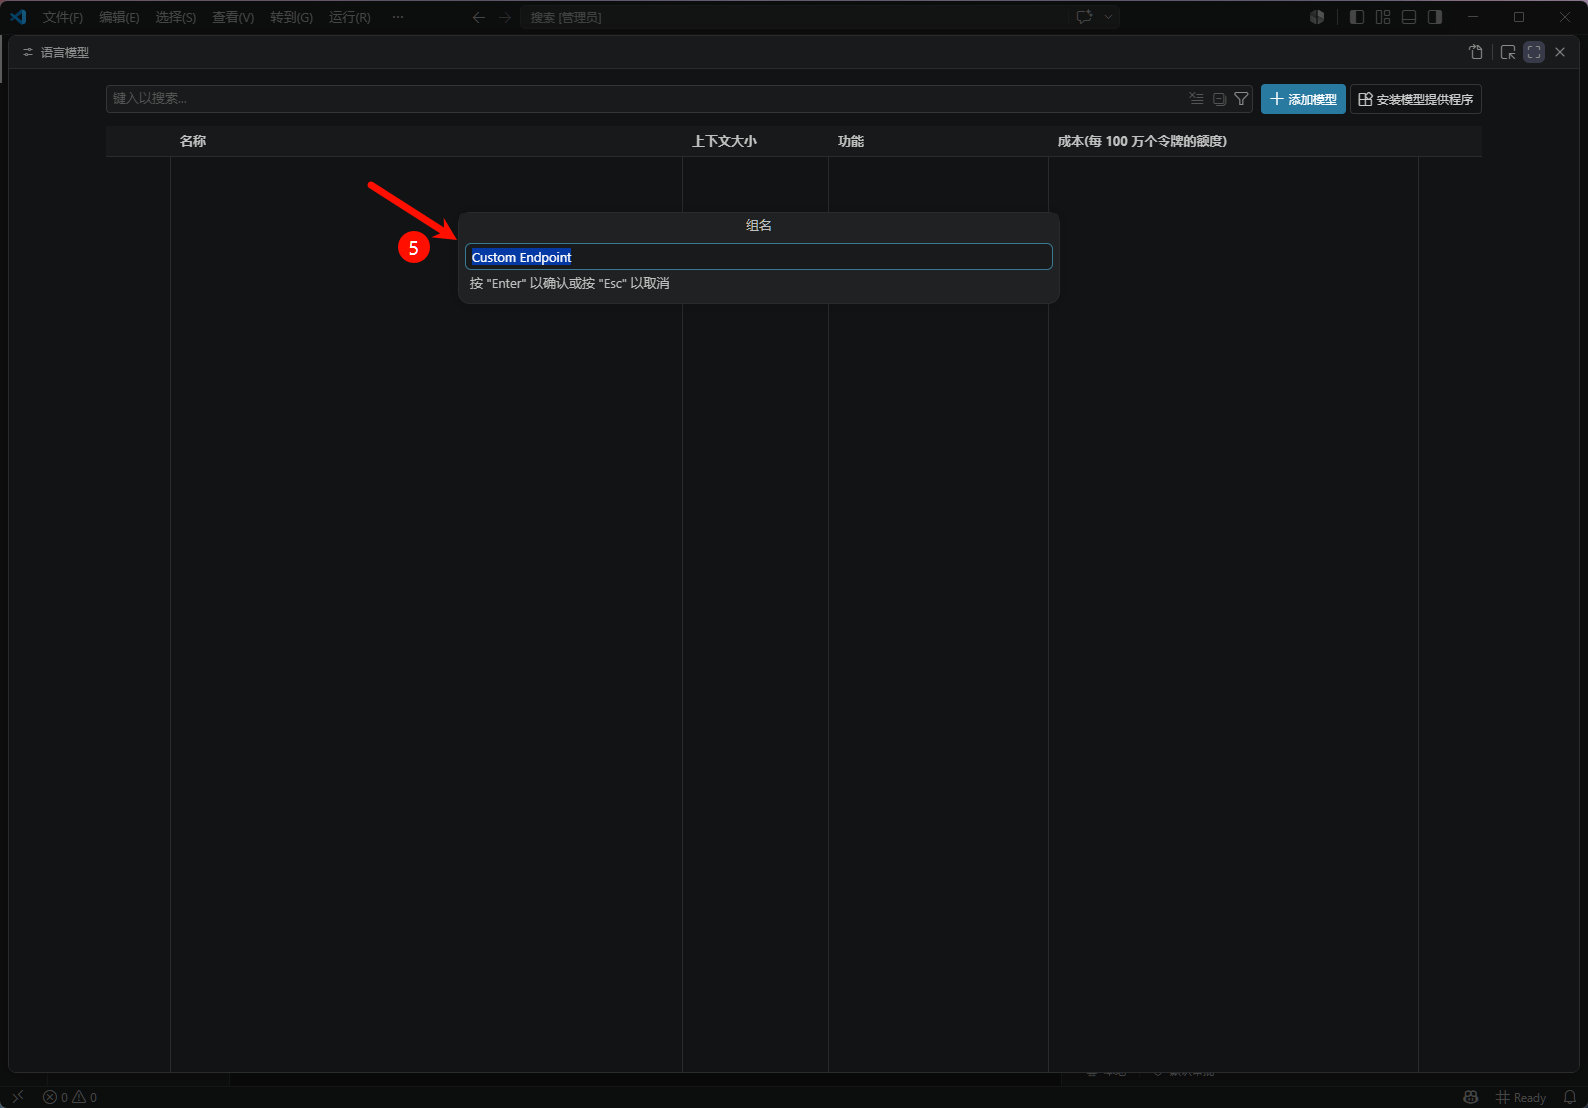
 在弹出的命名对话框中为这个端点命名(可保持默认 `Custom Endpoint`),按回车确认。
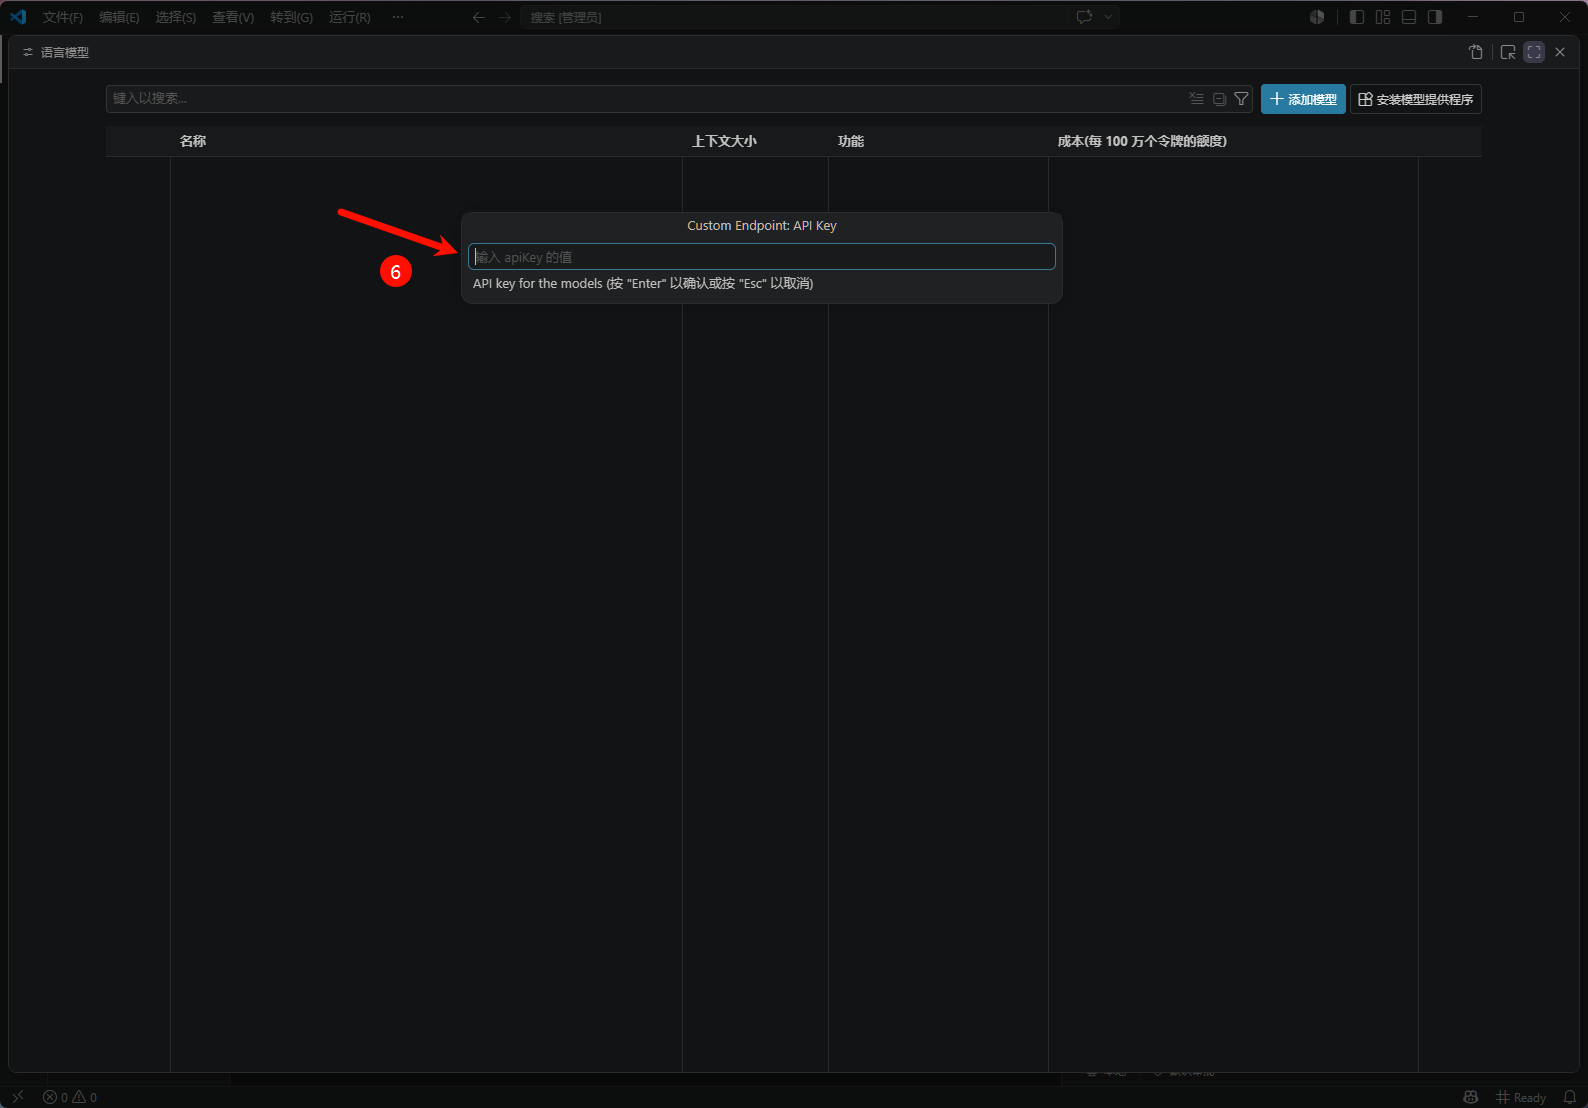
 ### 步骤 3:输入 HaiToken API Key
在弹出的 API Key 对话框中,粘贴你的 HaiToken API Key,按回车确认。
### 步骤 3:输入 HaiToken API Key
在弹出的 API Key 对话框中,粘贴你的 HaiToken API Key,按回车确认。
 ### 步骤 4:选择 API 类型
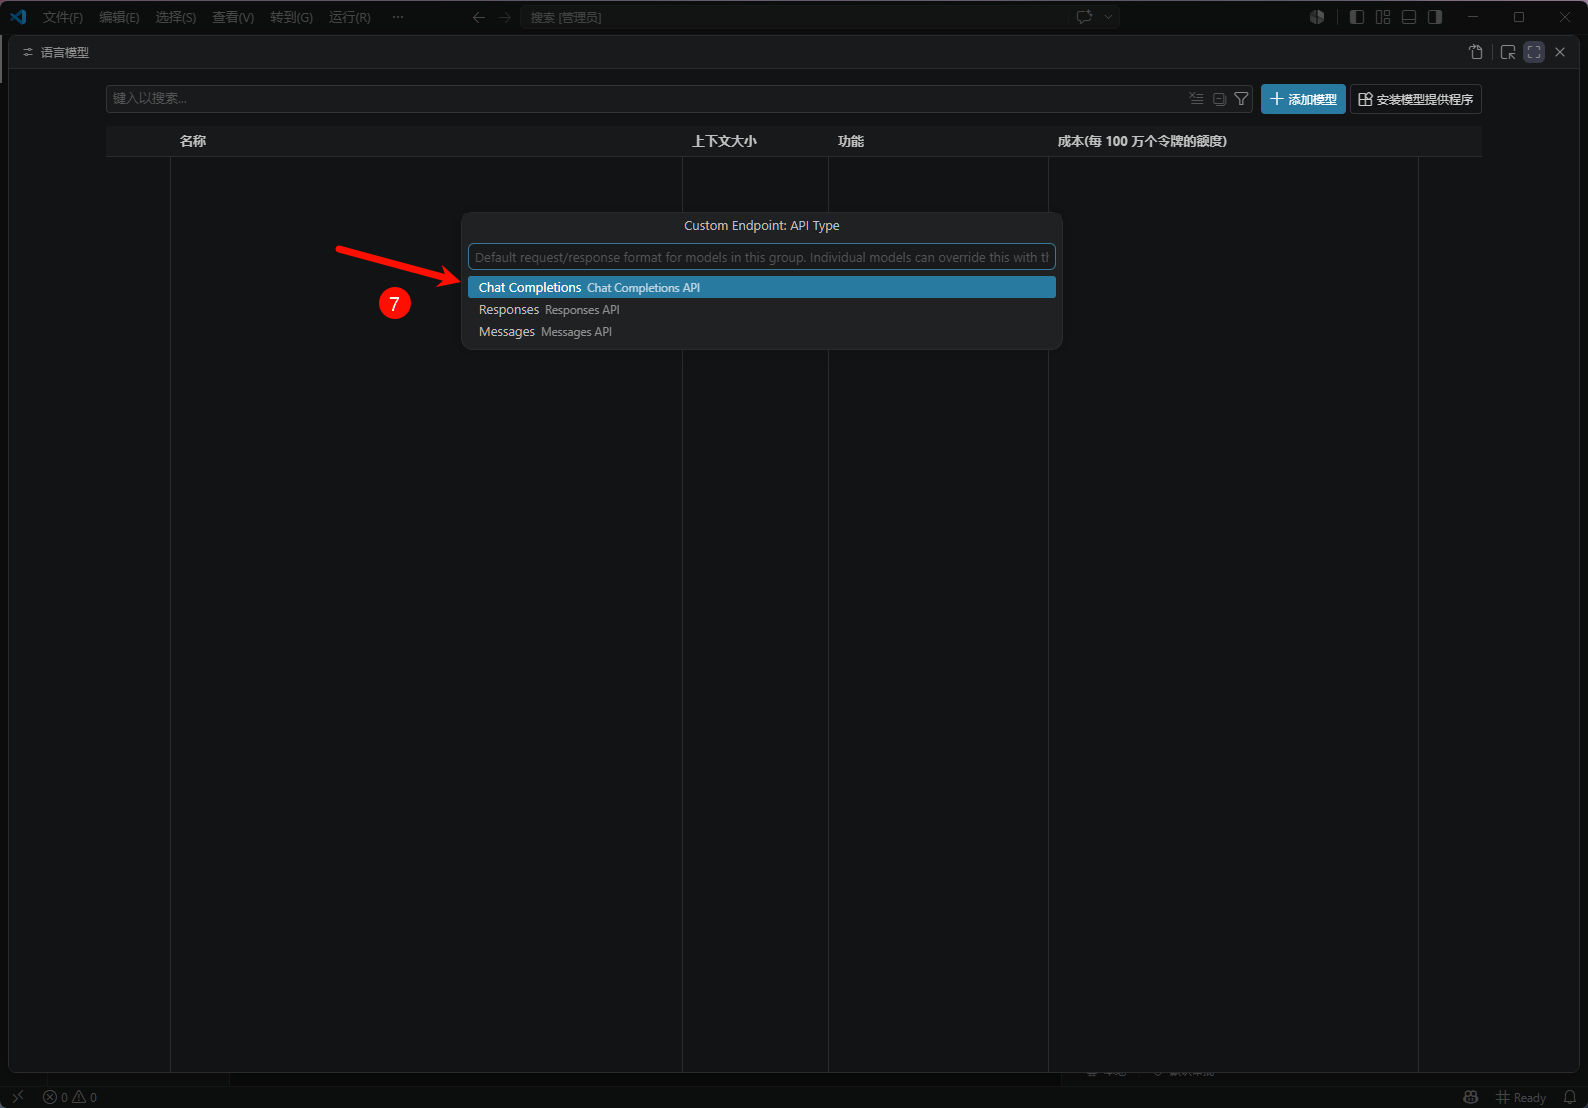
在 API Type 对话框中,选择 **Chat Completions**(对应 OpenAI Chat Completions 协议),按回车确认。
### 步骤 4:选择 API 类型
在 API Type 对话框中,选择 **Chat Completions**(对应 OpenAI Chat Completions 协议),按回车确认。
 ### 步骤 5:编辑配置文件填写模型 ID 和 URL
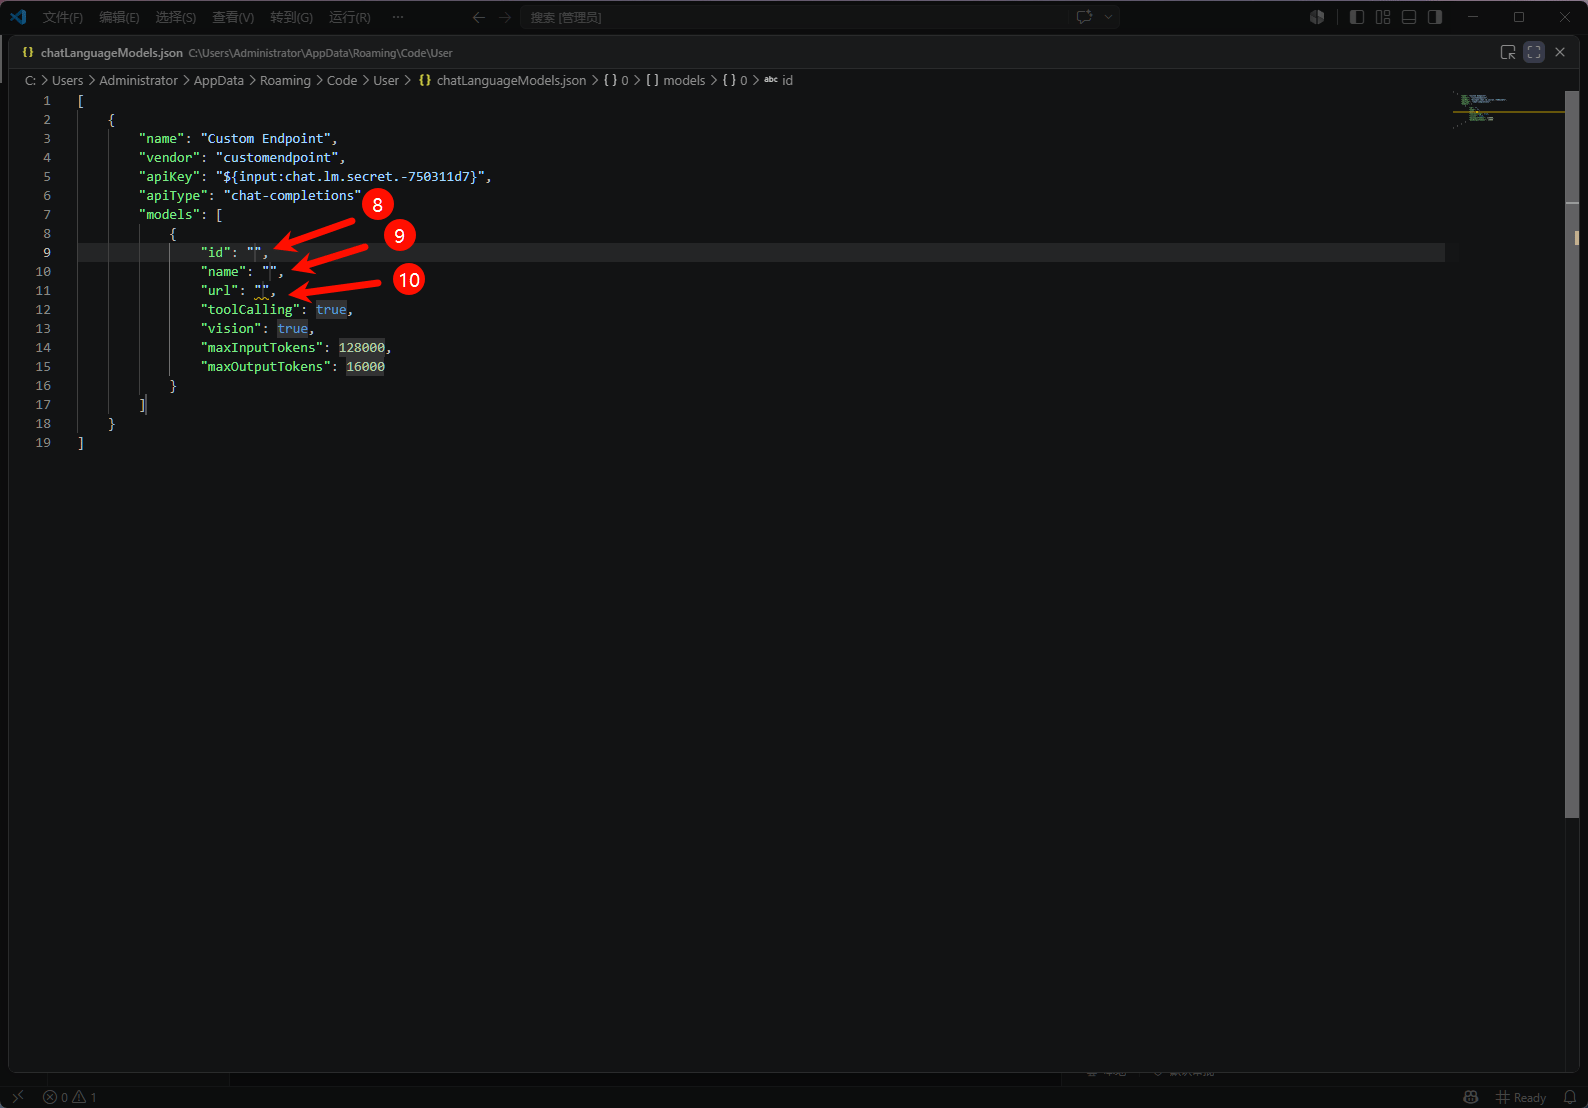
完成上述向导后,VS Code 会自动打开 `chatLanguageModels.json` 配置文件。找到刚才创建的 Custom Endpoint 条目,在 `models` 数组中填写以下字段:
### 步骤 5:编辑配置文件填写模型 ID 和 URL
完成上述向导后,VS Code 会自动打开 `chatLanguageModels.json` 配置文件。找到刚才创建的 Custom Endpoint 条目,在 `models` 数组中填写以下字段:
 | 字段 | 填写值 |
| ------ | ----------------------------------------------------- |
| `id` | HaiToken 可用模型 ID,例如 `gpt-5.4` |
| `name` | 模型在选择器中显示的名称,例如 `gpt-5.4` |
| `url` | `https://api.haitoken.ai/v1/chat/completions`(完整请求地址) |
保存文件后,返回 Chat 面板,在模型选择器中即可看到并切换到刚才添加的 HaiToken 模型。
## 验证步骤
1. 打开 VS Code Chat 面板。
2. 在模型选择器中选择 HaiToken 模型。
3. 发送一条简单消息,例如 `hello`。
4. 如果可以正常返回结果,说明接入成功。
## 补充说明
| 项目 | 推荐值 |
| -------- | --------------------------------------------- |
| Base URL | `https://api.haitoken.ai/v1` |
| 完整请求地址 | `https://api.haitoken.ai/v1/chat/completions` |
| 实际请求路径 | `POST /v1/chat/completions` |
| 鉴权头 | `Authorization: Bearer YOUR_API_KEY` |
此 BYOK 路径主要覆盖 Copilot Chat 及相关 Agent 体验。标准代码补全(行内建议)不在当前 BYOK 覆盖范围内,可能会继续使用 Copilot 官方模型。
## 如何切换模型
在 VS Code 中打开聊天模型选择器,选择另一个 HaiToken 模型即可。如果列表中没有你想要的模型,回到 **Manage Language Models**,按步骤 2–5 再添加一个,或在 `chatLanguageModels.json` 中为已有 Custom Endpoint 的 `models` 数组追加一个模型对象。
## 常见问题
| 问题 | 解决方案 |
| ---------------------- | -------------------------------------------------------------------------------------------------------------------------------------------------------------------- |
| 看不到 Custom Endpoint 入口 | 不同 VS Code 版本、Copilot 套餐和更新渠道可见的入口不完全一致。如果看不到,请尝试更新到最新稳定版或 Insiders 版本,或参考 [Copilot BYOK 官方文档](https://docs.github.com/zh/copilot/bring-your-own-model) 确认当前版本支持的方式。 |
| 聊天能用了,但代码补全没有变化 | 这是正常现象。官方 BYOK 文档覆盖的是 Chat 和 Agent 相关功能,不覆盖行内代码补全。 |
| 提示 `401` 或鉴权失败 | 确认 API Key 填写正确,没有多余空格。VS Code 会以 `Authorization: Bearer YOUR_API_KEY` 的方式发送。 |
| 提示 `model not found` | 确认 `chatLanguageModels.json` 中 `models[].id` 与 HaiToken 暴露的模型 ID 完全一致。可以用 `curl https://api.haitoken.ai/v1/models -H "Authorization: Bearer YOUR_API_KEY"` 确认可用模型。 |
| 配置已保存,但请求未经过 HaiToken | 确认 `models[].url` 填写的是完整地址 `https://api.haitoken.ai/v1/chat/completions`;在聊天模型选择器中重新选择一次模型,或重启 VS Code 后再试。 |
## 下一步
* 查看 [获取 API Key](/docs/zh/quickstart/get-api-key)
* 查看 [OpenAI 格式 API 文档](/docs/zh/api-reference/chat/openai-format)
* 查看 [模型列表](/docs/zh/api-reference/models/list-models)
| 字段 | 填写值 |
| ------ | ----------------------------------------------------- |
| `id` | HaiToken 可用模型 ID,例如 `gpt-5.4` |
| `name` | 模型在选择器中显示的名称,例如 `gpt-5.4` |
| `url` | `https://api.haitoken.ai/v1/chat/completions`(完整请求地址) |
保存文件后,返回 Chat 面板,在模型选择器中即可看到并切换到刚才添加的 HaiToken 模型。
## 验证步骤
1. 打开 VS Code Chat 面板。
2. 在模型选择器中选择 HaiToken 模型。
3. 发送一条简单消息,例如 `hello`。
4. 如果可以正常返回结果,说明接入成功。
## 补充说明
| 项目 | 推荐值 |
| -------- | --------------------------------------------- |
| Base URL | `https://api.haitoken.ai/v1` |
| 完整请求地址 | `https://api.haitoken.ai/v1/chat/completions` |
| 实际请求路径 | `POST /v1/chat/completions` |
| 鉴权头 | `Authorization: Bearer YOUR_API_KEY` |
此 BYOK 路径主要覆盖 Copilot Chat 及相关 Agent 体验。标准代码补全(行内建议)不在当前 BYOK 覆盖范围内,可能会继续使用 Copilot 官方模型。
## 如何切换模型
在 VS Code 中打开聊天模型选择器,选择另一个 HaiToken 模型即可。如果列表中没有你想要的模型,回到 **Manage Language Models**,按步骤 2–5 再添加一个,或在 `chatLanguageModels.json` 中为已有 Custom Endpoint 的 `models` 数组追加一个模型对象。
## 常见问题
| 问题 | 解决方案 |
| ---------------------- | -------------------------------------------------------------------------------------------------------------------------------------------------------------------- |
| 看不到 Custom Endpoint 入口 | 不同 VS Code 版本、Copilot 套餐和更新渠道可见的入口不完全一致。如果看不到,请尝试更新到最新稳定版或 Insiders 版本,或参考 [Copilot BYOK 官方文档](https://docs.github.com/zh/copilot/bring-your-own-model) 确认当前版本支持的方式。 |
| 聊天能用了,但代码补全没有变化 | 这是正常现象。官方 BYOK 文档覆盖的是 Chat 和 Agent 相关功能,不覆盖行内代码补全。 |
| 提示 `401` 或鉴权失败 | 确认 API Key 填写正确,没有多余空格。VS Code 会以 `Authorization: Bearer YOUR_API_KEY` 的方式发送。 |
| 提示 `model not found` | 确认 `chatLanguageModels.json` 中 `models[].id` 与 HaiToken 暴露的模型 ID 完全一致。可以用 `curl https://api.haitoken.ai/v1/models -H "Authorization: Bearer YOUR_API_KEY"` 确认可用模型。 |
| 配置已保存,但请求未经过 HaiToken | 确认 `models[].url` 填写的是完整地址 `https://api.haitoken.ai/v1/chat/completions`;在聊天模型选择器中重新选择一次模型,或重启 VS Code 后再试。 |
## 下一步
* 查看 [获取 API Key](/docs/zh/quickstart/get-api-key)
* 查看 [OpenAI 格式 API 文档](/docs/zh/api-reference/chat/openai-format)
* 查看 [模型列表](/docs/zh/api-reference/models/list-models)