> ## Documentation Index
> Fetch the complete documentation index at: https://docs.haitoken.ai/llms.txt
> Use this file to discover all available pages before exploring further.
# WorkBuddy
> Connect WorkBuddy to HaiToken
WorkBuddy supports HaiToken through custom models. The two most common ways are:
1. Add a custom model directly in the WorkBuddy UI for quick verification
2. Maintain models in local `models.json` for longer-term use or project-based management
The core configuration is the same in both paths:
* Use the full endpoint `https://api.haitoken.ai/v1/chat/completions`
* Use a real HaiToken model ID as the model name
* Use your HaiToken API key
## What You Need
* A HaiToken API key
* At least one available model ID, such as `deepseek-v4-flash`
* Full chat completions endpoint: `https://api.haitoken.ai/v1/chat/completions`
## Quick Mapping
| Item | Meaning |
| ----------------------- | ------------------------------------------------------------------- |
| Actual request endpoint | `https://api.haitoken.ai/v1/chat/completions` |
| Protocol | OpenAI Chat Completions |
| Auth header | `Authorization: Bearer YOUR_API_KEY` |
| Model source | A custom model added in the UI or registered in local `models.json` |
In WorkBuddy, this is not a generic `Base URL`. You should enter the full endpoint `https://api.haitoken.ai/v1/chat/completions`.
## Mode 1: Add It Quickly in the WorkBuddy UI
This is the best path for a first validation.
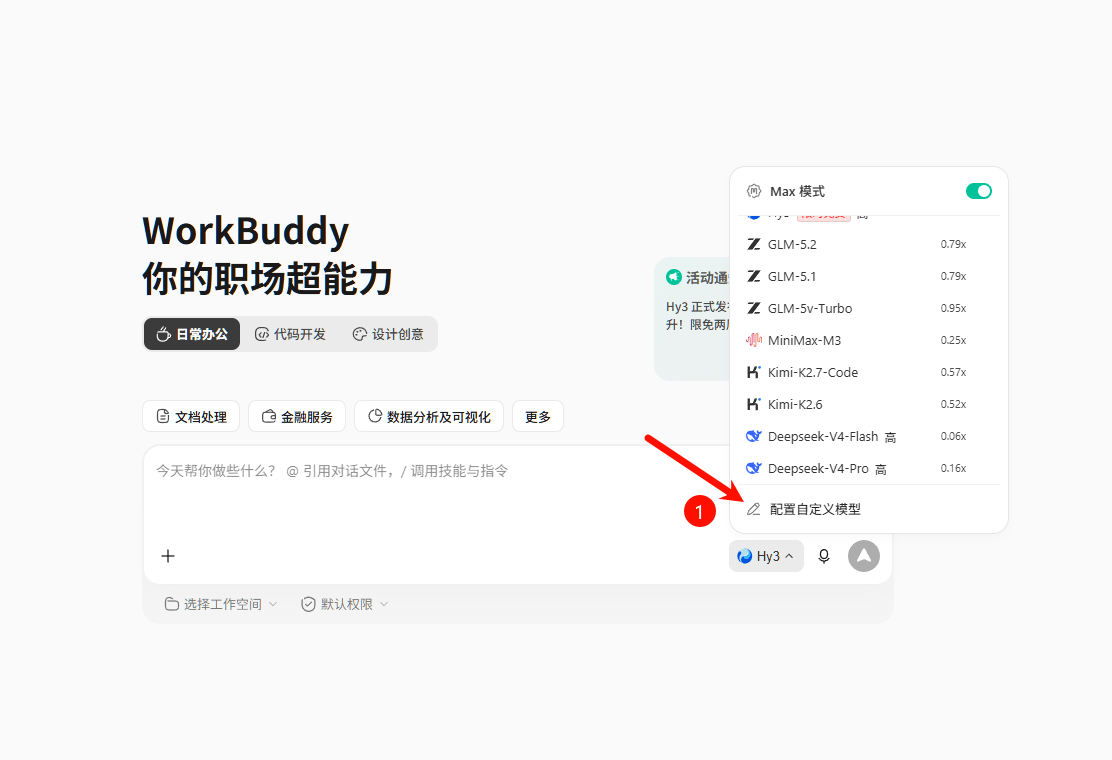
### Step 1: Open the custom model entry
In the chat UI, click the current model and choose **Configure Custom Model** from the dropdown.
 ### Step 2: Choose `Custom`
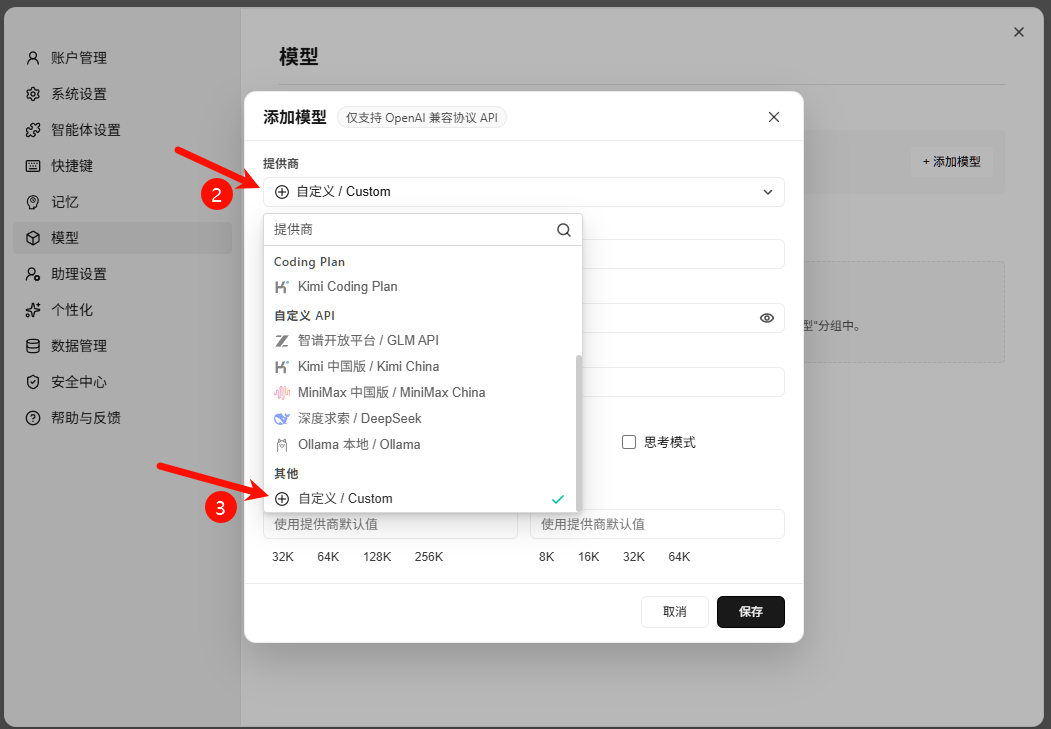
In the add-model dialog, choose **Custom** in the provider list.
### Step 2: Choose `Custom`
In the add-model dialog, choose **Custom** in the provider list.
 ### Step 3: Fill the HaiToken values
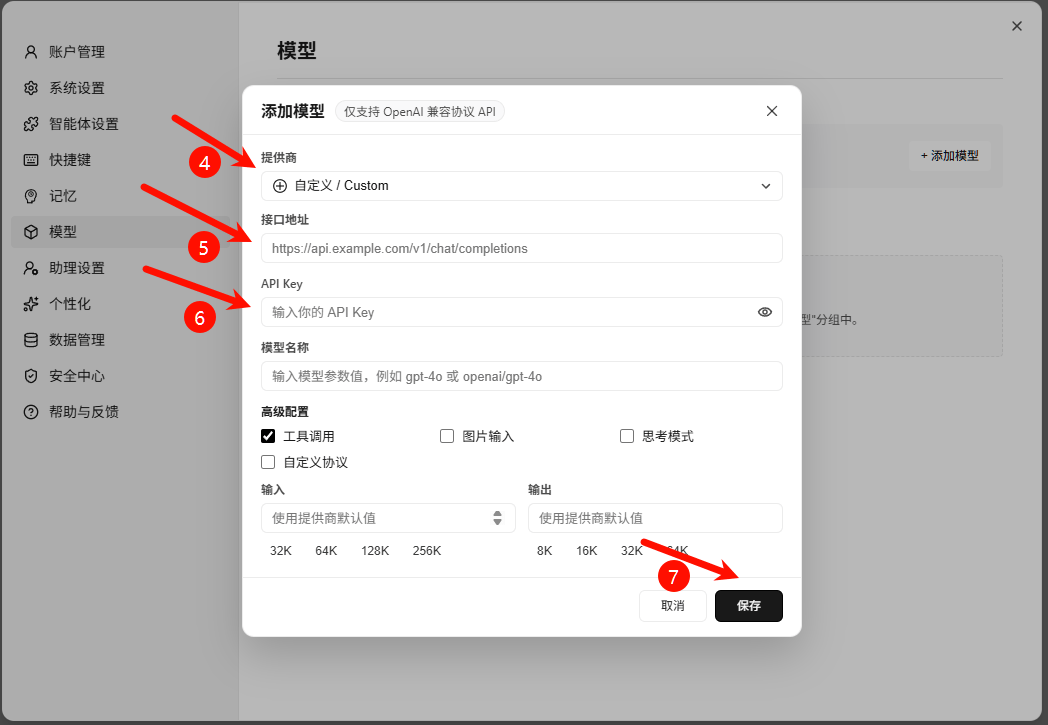
Use the following values and then click **Save**:
| Field | Recommended value |
| ---------- | ---------------------------------------------------- |
| Provider | `Custom` |
| Endpoint | `https://api.haitoken.ai/v1/chat/completions` |
| API Key | Your HaiToken API key |
| Model name | A real HaiToken model ID such as `deepseek-v4-flash` |
### Step 3: Fill the HaiToken values
Use the following values and then click **Save**:
| Field | Recommended value |
| ---------- | ---------------------------------------------------- |
| Provider | `Custom` |
| Endpoint | `https://api.haitoken.ai/v1/chat/completions` |
| API Key | Your HaiToken API key |
| Model name | A real HaiToken model ID such as `deepseek-v4-flash` |
 ### Step 4: Adjust advanced options if needed
If the current UI exposes capability toggles, match them to the real model capability:
* Enable `Tool Call` only if the model supports tools
* Enable `Reasoning` only if the model supports reasoning mode
* Do not enable image capability if the model does not support image input
### Step 5: Return to chat and test it
Switch to the newly added model and send a simple message such as `hi`.
If a normal response comes back, the integration is working.
### Checklist
1. The model appears in the model dropdown.
2. A simple test request returns normally.
3. If this WorkBuddy entry supports streaming, the reply appears progressively instead of only at the end.
### FAQ
#### The model does not appear in the list
Check the following first:
* The model name is a real HaiToken model ID
* The endpoint is the full URL `https://api.haitoken.ai/v1/chat/completions`
* You reopened the model list or reopened WorkBuddy after saving
#### Authentication error
Make sure the API key you entered is valid and does not include extra spaces.
#### The request is sent but the model does not respond
Check whether the model ID exists, whether the endpoint is complete, and whether you enabled options that the current model does not support.
The UI flow is better for quick verification. If you want to manage multiple models or keep project-specific model lists, use the `models.json` flow below.
## Mode 2: Configure Local `models.json`
This path is better for long-term model management.
WorkBuddy / CodeBuddy commonly uses two config scopes:
* User-level: `~/.codebuddy/models.json`
* Project-level: `/.codebuddy/models.json`
If you only want HaiToken in the current project, use the project-level config first. If you want it visible everywhere, use the user-level config.
### Step 1: Choose the scope and create `models.json`
Decide where the config should live, then create or edit `models.json` there.
Save the file as UTF-8 without BOM. Some desktop builds fail to read `models.json` when it includes BOM.
### Step 2: Add the HaiToken models
Example:
```json theme={null}
{
"models": [
{
"id": "deepseek-v4-flash",
"name": "HaiToken DeepSeek V4 Flash",
"vendor": "HaiToken",
"url": "https://api.haitoken.ai/v1/chat/completions",
"apiKey": "${HAITOKEN_API_KEY}",
"maxInputTokens": 128000,
"maxOutputTokens": 8192,
"supportsToolCall": true,
"supportsImages": false,
"supportsReasoning": true
},
{
"id": "deepseek-v4-pro",
"name": "HaiToken DeepSeek V4 Pro",
"vendor": "HaiToken",
"url": "https://api.haitoken.ai/v1/chat/completions",
"apiKey": "${HAITOKEN_API_KEY}",
"maxInputTokens": 128000,
"maxOutputTokens": 8192,
"supportsToolCall": true,
"supportsImages": false,
"supportsReasoning": true,
"relatedModels": {
"lite": "deepseek-v4-flash",
"reasoning": "deepseek-v4-pro"
}
}
],
"availableModels": [
"deepseek-v4-flash",
"deepseek-v4-pro"
]
}
```
### Step 3: Set the environment variable
If you use `${HAITOKEN_API_KEY}`, set the variable before starting WorkBuddy.
Windows PowerShell:
```powershell theme={null}
$env:HAITOKEN_API_KEY = "YOUR_API_KEY"
```
macOS / Linux:
```bash theme={null}
export HAITOKEN_API_KEY="YOUR_API_KEY"
```
### Step 4: Save and reload WorkBuddy
After saving the file, first check whether WorkBuddy refreshes the model list automatically.
If the model still does not appear, fully close WorkBuddy and reopen it once.
### Key Notes
#### `url` must be the full endpoint
Whether you add the model in the UI or register it in `models.json`, `url` must point to the full endpoint:
```text theme={null}
https://api.haitoken.ai/v1/chat/completions
```
Do not use:
```text theme={null}
https://api.haitoken.ai
https://api.haitoken.ai/v1
```
#### `apiKey` becomes a Bearer token
WorkBuddy expects the following auth pattern:
```http theme={null}
Authorization: Bearer YOUR_API_KEY
```
If `apiKey` is written as `${HAITOKEN_API_KEY}`, WorkBuddy resolves it and sends it as `Authorization: Bearer ...`, not as `X-Api-Key`.
#### What `availableModels` does
When you use `models.json`, `availableModels` controls which models appear in the WorkBuddy dropdown. It does not decide whether HaiToken actually supports the model.
#### How `availableModels` relates to `/v1/models`
These are easy to confuse:
* `GET /v1/models` is the set of models visible to your current HaiToken API key
* `models[].id` is the local model ID you register in WorkBuddy and must match a real HaiToken model ID
* `availableModels` is only the local display allowlist in WorkBuddy
You can think of it like this: local `models.json` controls what WorkBuddy shows and tries to call, while HaiToken `GET /v1/models` helps you confirm whether your API key actually has access to those models.
Check visible models first if needed:
```bash theme={null}
curl https://api.haitoken.ai/v1/models \
-H "Authorization: Bearer YOUR_API_KEY"
```
Then copy the returned `id` values exactly into the UI or into `models[].id`, and decide whether to include them in `availableModels`.
#### When `relatedModels` is useful
If you want a main model to switch automatically to a faster or stronger model in different cases, configure `relatedModels`.
* `lite` usually points to a faster and cheaper model
* `reasoning` usually points to a stronger reasoning model
### Checklist
1. WorkBuddy shows `HaiToken DeepSeek V4 Flash` or the name you configured in the model dropdown.
2. A simple conversation returns normally without auth failures or missing-model errors.
3. If the current entry supports streaming, the reply appears incrementally rather than only at the end.
## FAQ
### The model does not appear in the list
If you used the UI flow, check:
* The model ID matches the value returned by HaiToken `GET /v1/models`
* The `url` is the full endpoint
* You reopened WorkBuddy or the model list after saving
If you used `models.json`, also check:
* The file path is correct
* The JSON syntax is valid
* `availableModels` includes your model ID
### Authentication error
Make sure the API key is valid, or make sure `HAITOKEN_API_KEY` exists in the same environment where WorkBuddy starts.
### 404 or connection error
This is usually a wrong `url`. WorkBuddy must use the full endpoint `https://api.haitoken.ai/v1/chat/completions`.
### The response returns, but not as a stream
First confirm that the current WorkBuddy entry actually supports streaming. If it does but still behaves oddly, try another model first. HaiToken supports SSE streaming and already adapts some client-side streaming compatibility headers.
## Next
* See [Get API Key](/docs/en/quickstart/get-api-key)
* See [OpenAI format API](/docs/en/api-reference/chat/openai-format)
* See [List models](/docs/en/api-reference/models/list-models)
### Step 4: Adjust advanced options if needed
If the current UI exposes capability toggles, match them to the real model capability:
* Enable `Tool Call` only if the model supports tools
* Enable `Reasoning` only if the model supports reasoning mode
* Do not enable image capability if the model does not support image input
### Step 5: Return to chat and test it
Switch to the newly added model and send a simple message such as `hi`.
If a normal response comes back, the integration is working.
### Checklist
1. The model appears in the model dropdown.
2. A simple test request returns normally.
3. If this WorkBuddy entry supports streaming, the reply appears progressively instead of only at the end.
### FAQ
#### The model does not appear in the list
Check the following first:
* The model name is a real HaiToken model ID
* The endpoint is the full URL `https://api.haitoken.ai/v1/chat/completions`
* You reopened the model list or reopened WorkBuddy after saving
#### Authentication error
Make sure the API key you entered is valid and does not include extra spaces.
#### The request is sent but the model does not respond
Check whether the model ID exists, whether the endpoint is complete, and whether you enabled options that the current model does not support.
The UI flow is better for quick verification. If you want to manage multiple models or keep project-specific model lists, use the `models.json` flow below.
## Mode 2: Configure Local `models.json`
This path is better for long-term model management.
WorkBuddy / CodeBuddy commonly uses two config scopes:
* User-level: `~/.codebuddy/models.json`
* Project-level: `/.codebuddy/models.json`
If you only want HaiToken in the current project, use the project-level config first. If you want it visible everywhere, use the user-level config.
### Step 1: Choose the scope and create `models.json`
Decide where the config should live, then create or edit `models.json` there.
Save the file as UTF-8 without BOM. Some desktop builds fail to read `models.json` when it includes BOM.
### Step 2: Add the HaiToken models
Example:
```json theme={null}
{
"models": [
{
"id": "deepseek-v4-flash",
"name": "HaiToken DeepSeek V4 Flash",
"vendor": "HaiToken",
"url": "https://api.haitoken.ai/v1/chat/completions",
"apiKey": "${HAITOKEN_API_KEY}",
"maxInputTokens": 128000,
"maxOutputTokens": 8192,
"supportsToolCall": true,
"supportsImages": false,
"supportsReasoning": true
},
{
"id": "deepseek-v4-pro",
"name": "HaiToken DeepSeek V4 Pro",
"vendor": "HaiToken",
"url": "https://api.haitoken.ai/v1/chat/completions",
"apiKey": "${HAITOKEN_API_KEY}",
"maxInputTokens": 128000,
"maxOutputTokens": 8192,
"supportsToolCall": true,
"supportsImages": false,
"supportsReasoning": true,
"relatedModels": {
"lite": "deepseek-v4-flash",
"reasoning": "deepseek-v4-pro"
}
}
],
"availableModels": [
"deepseek-v4-flash",
"deepseek-v4-pro"
]
}
```
### Step 3: Set the environment variable
If you use `${HAITOKEN_API_KEY}`, set the variable before starting WorkBuddy.
Windows PowerShell:
```powershell theme={null}
$env:HAITOKEN_API_KEY = "YOUR_API_KEY"
```
macOS / Linux:
```bash theme={null}
export HAITOKEN_API_KEY="YOUR_API_KEY"
```
### Step 4: Save and reload WorkBuddy
After saving the file, first check whether WorkBuddy refreshes the model list automatically.
If the model still does not appear, fully close WorkBuddy and reopen it once.
### Key Notes
#### `url` must be the full endpoint
Whether you add the model in the UI or register it in `models.json`, `url` must point to the full endpoint:
```text theme={null}
https://api.haitoken.ai/v1/chat/completions
```
Do not use:
```text theme={null}
https://api.haitoken.ai
https://api.haitoken.ai/v1
```
#### `apiKey` becomes a Bearer token
WorkBuddy expects the following auth pattern:
```http theme={null}
Authorization: Bearer YOUR_API_KEY
```
If `apiKey` is written as `${HAITOKEN_API_KEY}`, WorkBuddy resolves it and sends it as `Authorization: Bearer ...`, not as `X-Api-Key`.
#### What `availableModels` does
When you use `models.json`, `availableModels` controls which models appear in the WorkBuddy dropdown. It does not decide whether HaiToken actually supports the model.
#### How `availableModels` relates to `/v1/models`
These are easy to confuse:
* `GET /v1/models` is the set of models visible to your current HaiToken API key
* `models[].id` is the local model ID you register in WorkBuddy and must match a real HaiToken model ID
* `availableModels` is only the local display allowlist in WorkBuddy
You can think of it like this: local `models.json` controls what WorkBuddy shows and tries to call, while HaiToken `GET /v1/models` helps you confirm whether your API key actually has access to those models.
Check visible models first if needed:
```bash theme={null}
curl https://api.haitoken.ai/v1/models \
-H "Authorization: Bearer YOUR_API_KEY"
```
Then copy the returned `id` values exactly into the UI or into `models[].id`, and decide whether to include them in `availableModels`.
#### When `relatedModels` is useful
If you want a main model to switch automatically to a faster or stronger model in different cases, configure `relatedModels`.
* `lite` usually points to a faster and cheaper model
* `reasoning` usually points to a stronger reasoning model
### Checklist
1. WorkBuddy shows `HaiToken DeepSeek V4 Flash` or the name you configured in the model dropdown.
2. A simple conversation returns normally without auth failures or missing-model errors.
3. If the current entry supports streaming, the reply appears incrementally rather than only at the end.
## FAQ
### The model does not appear in the list
If you used the UI flow, check:
* The model ID matches the value returned by HaiToken `GET /v1/models`
* The `url` is the full endpoint
* You reopened WorkBuddy or the model list after saving
If you used `models.json`, also check:
* The file path is correct
* The JSON syntax is valid
* `availableModels` includes your model ID
### Authentication error
Make sure the API key is valid, or make sure `HAITOKEN_API_KEY` exists in the same environment where WorkBuddy starts.
### 404 or connection error
This is usually a wrong `url`. WorkBuddy must use the full endpoint `https://api.haitoken.ai/v1/chat/completions`.
### The response returns, but not as a stream
First confirm that the current WorkBuddy entry actually supports streaming. If it does but still behaves oddly, try another model first. HaiToken supports SSE streaming and already adapts some client-side streaming compatibility headers.
## Next
* See [Get API Key](/docs/en/quickstart/get-api-key)
* See [OpenAI format API](/docs/en/api-reference/chat/openai-format)
* See [List models](/docs/en/api-reference/models/list-models)