> ## Documentation Index
> Fetch the complete documentation index at: https://docs.haitoken.ai/llms.txt
> Use this file to discover all available pages before exploring further.
# CC Switch
> Connect CC Switch to HaiToken
CC Switch does not connect to HaiToken by changing environment variables. Instead, you add a Provider inside the desktop app and then switch your target tool to that Provider.
For HaiToken, the recommended path is the OpenAI-compatible flow, because CC Switch can fill one `Endpoint URL`, one `API Key`, and fetch model lists from `/v1/models`.
## Why There Are Two Integration Modes
Many users see `App-specific Provider` and `Universal Provider` for the first time and assume they are two different HaiToken protocols. They are not.
The core fields are exactly the same in both entries:
* `Endpoint URL`
* `API Key`
* `Model`
The only real difference is the scope of the Provider:
* `App-specific Provider`: only for the current app
* `Universal Provider`: shared across multiple apps
You can think of them as two scopes for the same HaiToken configuration, not two different protocols.
If this is your first HaiToken setup, or if you only want to verify one tool such as `OpenClaw` or `OpenCode`, start with `App-specific Provider`. It is easier to debug.
Switch to `Universal Provider` only after you already know the HaiToken configuration works and you want to reuse it across multiple apps.
## Good Fits
* You already use CC Switch to manage tools such as OpenCode, OpenClaw, or Codex
* You want HaiToken to act as the shared model entry point
* You want to switch Providers in a GUI and fetch model lists directly
## What You Need
* A HaiToken API key
* HaiToken gateway URL: `https://api.haitoken.ai`
* At least one available model ID, such as `deepseek-v4-flash`
In CC Switch, the recommended `Endpoint URL` is the gateway prefix `https://api.haitoken.ai`, not the full path `https://api.haitoken.ai/v1/chat/completions`. In the default mode, CC Switch appends `/v1/chat/completions` and `/v1/models` for you.
## Mode 1: Use It Only for the Current App
This corresponds to `App-specific Provider` in CC Switch. It only affects the current app and is the best choice when you want to verify one tool first.
### Step 1: Open the target app page
After starting CC Switch, switch to the app you want to connect, such as:
* OpenCode
* OpenClaw
* Codex
If you only want to verify one app first, stay on that app page.
### Step 2: Add a Provider
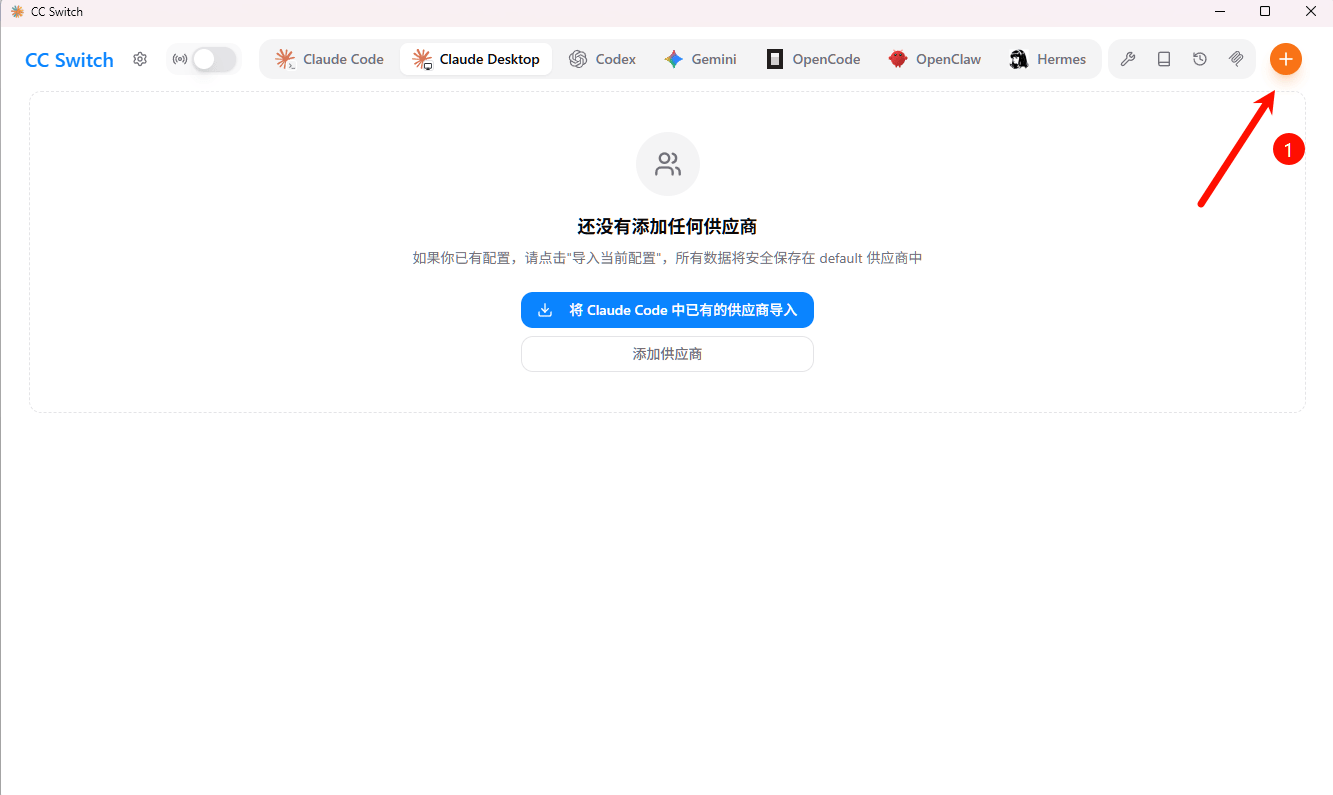
Click `+` in the top-right corner to open the Add Provider panel.
You will see two entries:
* `App-specific Provider`: only affects the current app
* `Universal Provider`: reuses one configuration across multiple apps
For the first HaiToken setup, choose `App-specific Provider`.
 ### Step 3: Enter the HaiToken configuration
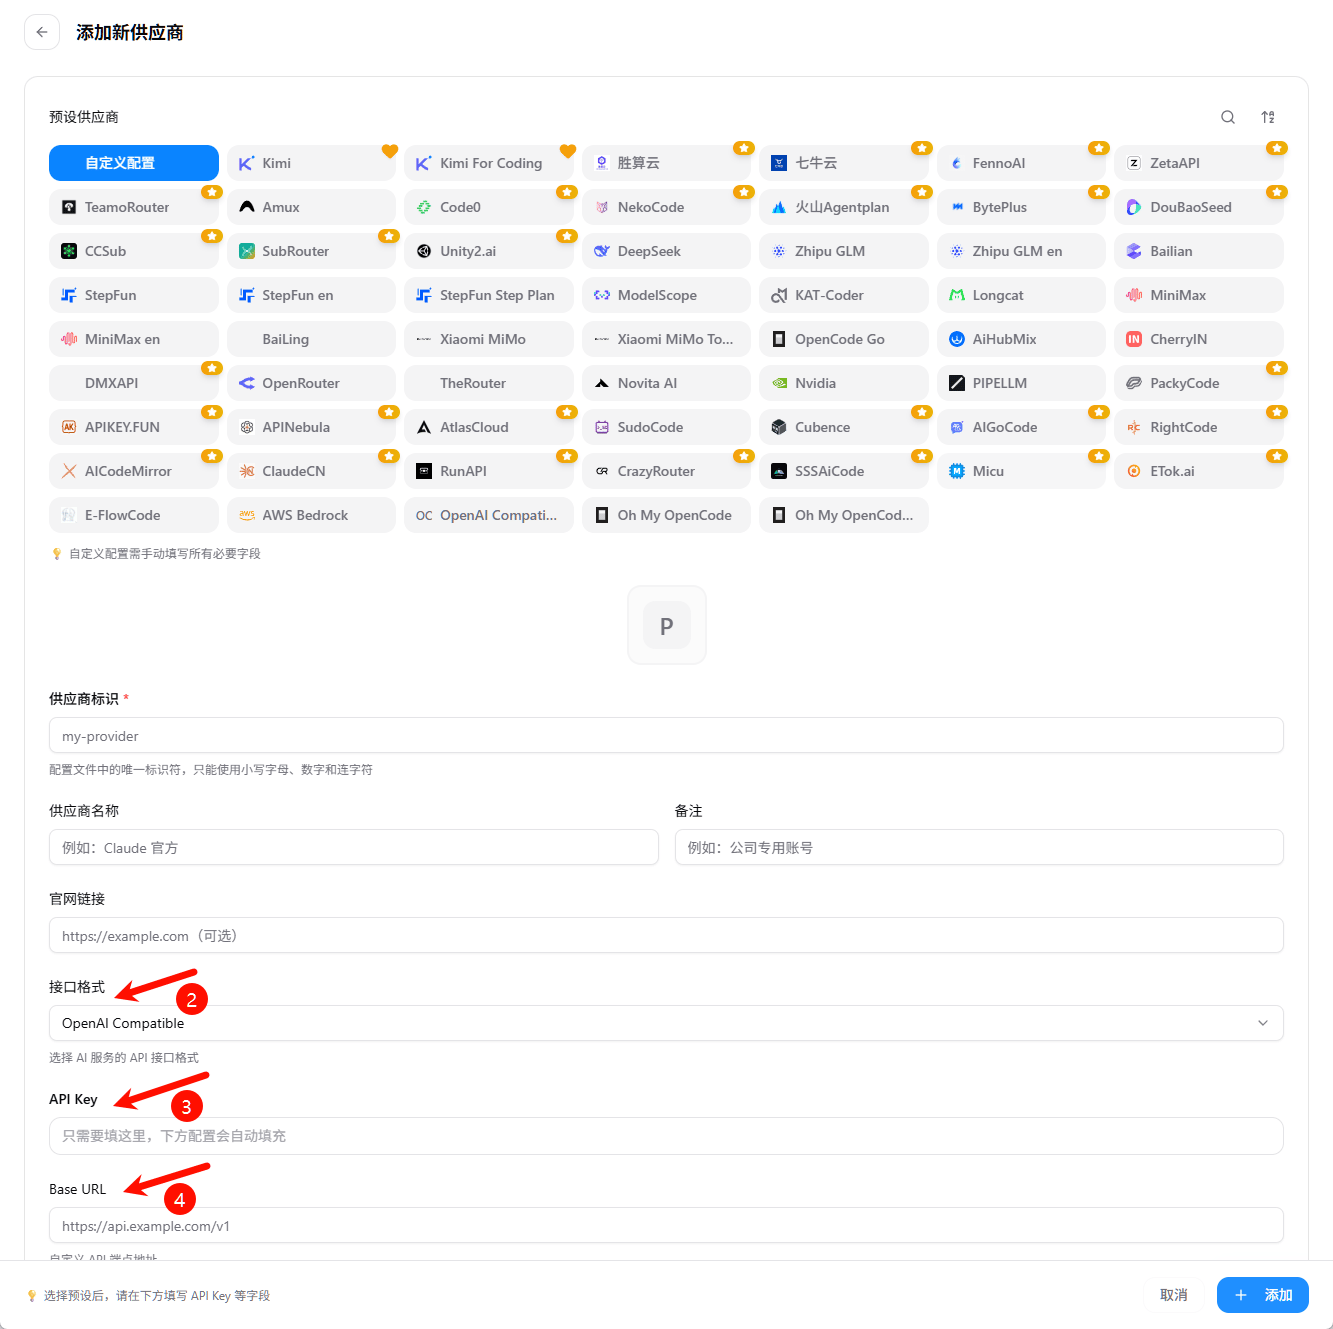
If the current app offers an `OpenAI Compatible` or `Custom` preset, choose it directly.
| Field | Recommended value |
| --------------------------- | ------------------------------- |
| Name | `HaiToken` |
| Endpoint URL / API Base URL | `https://api.haitoken.ai` |
| API Key | Your HaiToken API key |
| Model | For example `deepseek-v4-flash` |
If the form includes `Fetch Models`, click it once so CC Switch can load model IDs from HaiToken `/v1/models`.
### Step 3: Enter the HaiToken configuration
If the current app offers an `OpenAI Compatible` or `Custom` preset, choose it directly.
| Field | Recommended value |
| --------------------------- | ------------------------------- |
| Name | `HaiToken` |
| Endpoint URL / API Base URL | `https://api.haitoken.ai` |
| API Key | Your HaiToken API key |
| Model | For example `deepseek-v4-flash` |
If the form includes `Fetch Models`, click it once so CC Switch can load model IDs from HaiToken `/v1/models`.
 ### Step 4: Save and activate
Click `Add` or `Save`, then switch `HaiToken` to the active Provider.
If your target app is OpenCode, OpenClaw, or Codex, it is safer to restart that tool once after switching Providers.
### Checklist
1. You can see models returned by HaiToken in the model picker or via `Fetch Models`.
2. The target tool no longer shows auth failures or missing-model errors after switching to `HaiToken`.
3. A simple test prompt such as `hi` returns a normal response.
If the target tool is `OpenClaw`, also confirm that routing is enabled where needed.
### FAQ
#### 404 when fetching models
First check whether `Endpoint URL` was entered as `https://api.haitoken.ai/v1`. For CC Switch, the recommended value is the gateway prefix `https://api.haitoken.ai`.
#### The Provider is saved but the target tool still does not use it
Make sure `HaiToken` is the active Provider, then fully close and reopen the target tool.
If the target tool is `OpenClaw`, also check whether the matching route has been enabled.
#### The connection works but the model list is empty
Check which models your API key can see:
```bash theme={null}
curl https://api.haitoken.ai/v1/models \
-H "Authorization: Bearer YOUR_API_KEY"
```
If the API response is normal, go back to CC Switch and run `Fetch Models` again.
#### Can I use the full endpoint URL?
Only if you explicitly enabled `Full URL Mode` in CC Switch. For the standard HaiToken flow, you do not need that mode.
## Mode 2: Share One Provider Across Multiple Apps
This corresponds to `Universal Provider` in CC Switch. Use it when you want one HaiToken configuration to be reused across multiple apps.
### Good fits
* You manage multiple tools in CC Switch
* You do not want to re-enter the same endpoint and API key for every tool
* You want several apps to reuse the same model source as much as possible
### Step 1: Open the Add Provider panel
Click `+` in the top-right corner.
### Step 2: Choose `Universal Provider`
Select `Universal Provider` so the configuration can be reused by multiple apps.
### Step 3: Enter the HaiToken configuration
Use the same values as the `App-specific Provider` flow:
| Field | Recommended value |
| --------------------------- | ------------------------------- |
| Name | `HaiToken` |
| Endpoint URL / API Base URL | `https://api.haitoken.ai` |
| API Key | Your HaiToken API key |
| Model | For example `deepseek-v4-flash` |
If `Fetch Models` is available, run it once here as well.
### Step 4: Verify in each target app
After saving, switch between the apps you want to use and confirm that each of them can see and use the same HaiToken configuration.
### Checklist
* The target apps can read the `HaiToken` Provider
* At least one target app can send a normal request and get a normal response
* Switching models does not trigger auth failures or missing-model errors
The actual coverage of `Universal Provider` can vary between versions. If one app still does not read the shared configuration, fall back to `App-specific Provider` for that app.
## Key Configuration Notes
### What should `Endpoint URL` be?
Recommended:
```text theme={null}
https://api.haitoken.ai
```
Not recommended:
```text theme={null}
https://api.haitoken.ai/v1
https://api.haitoken.ai/v1/chat/completions
```
In the default CC Switch mode, `base_url` is treated as a prefix and fixed paths are appended automatically. If you include `/v1` or the full endpoint yourself, the final request path may be duplicated.
### How is the API key sent?
HaiToken uses OpenAI-compatible Bearer authentication:
```http theme={null}
Authorization: Bearer YOUR_API_KEY
```
### How should I select the model?
You have two options:
* Enter the model ID manually
* Use `Fetch Models` to load model IDs from `/v1/models`
If the model list can already be fetched successfully, the endpoint and API key are usually correct.
## When Routing Must Be Enabled
In CC Switch, the answer to whether `Routing / Local Routing` must be enabled is not the same for every tool. Use the following rule of thumb.
### Cases that clearly require routing
#### Codex using Chat Completions or non-GPT models
If your Codex upstream uses OpenAI Chat Completions, or if you are using third-party models that Codex does not natively assume, such as `DeepSeek`, `Kimi`, `GLM`, or `MiniMax`, routing should be enabled.
This is because CC Switch usually needs local protocol conversion, model mapping, or request forwarding in those cases.
#### Claude / Claude Code / Claude Desktop using non-default protocol formats
If you configure Claude-family tools with:
* `OpenAI Chat Completions`
* `OpenAI Responses API`
instead of the default Anthropic Messages format, you also need routing or proxy-based protocol conversion.
### Cases where routing should be checked first
#### OpenClaw: confirm routing in 3 steps
If your target tool is `OpenClaw`, check routing in this order:
1. Confirm the `HaiToken` Provider was saved and activated.
2. Confirm the OpenClaw-related **Routing** setting is enabled.
3. Send another test request and confirm traffic really goes through HaiToken.
If routing is not enabled, you may see situations such as:
* The Provider is saved successfully
* The model list can still be fetched
* But real requests do not go through HaiToken as expected
* Or switching Providers still does not seem to affect OpenClaw
### Step 4: Save and activate
Click `Add` or `Save`, then switch `HaiToken` to the active Provider.
If your target app is OpenCode, OpenClaw, or Codex, it is safer to restart that tool once after switching Providers.
### Checklist
1. You can see models returned by HaiToken in the model picker or via `Fetch Models`.
2. The target tool no longer shows auth failures or missing-model errors after switching to `HaiToken`.
3. A simple test prompt such as `hi` returns a normal response.
If the target tool is `OpenClaw`, also confirm that routing is enabled where needed.
### FAQ
#### 404 when fetching models
First check whether `Endpoint URL` was entered as `https://api.haitoken.ai/v1`. For CC Switch, the recommended value is the gateway prefix `https://api.haitoken.ai`.
#### The Provider is saved but the target tool still does not use it
Make sure `HaiToken` is the active Provider, then fully close and reopen the target tool.
If the target tool is `OpenClaw`, also check whether the matching route has been enabled.
#### The connection works but the model list is empty
Check which models your API key can see:
```bash theme={null}
curl https://api.haitoken.ai/v1/models \
-H "Authorization: Bearer YOUR_API_KEY"
```
If the API response is normal, go back to CC Switch and run `Fetch Models` again.
#### Can I use the full endpoint URL?
Only if you explicitly enabled `Full URL Mode` in CC Switch. For the standard HaiToken flow, you do not need that mode.
## Mode 2: Share One Provider Across Multiple Apps
This corresponds to `Universal Provider` in CC Switch. Use it when you want one HaiToken configuration to be reused across multiple apps.
### Good fits
* You manage multiple tools in CC Switch
* You do not want to re-enter the same endpoint and API key for every tool
* You want several apps to reuse the same model source as much as possible
### Step 1: Open the Add Provider panel
Click `+` in the top-right corner.
### Step 2: Choose `Universal Provider`
Select `Universal Provider` so the configuration can be reused by multiple apps.
### Step 3: Enter the HaiToken configuration
Use the same values as the `App-specific Provider` flow:
| Field | Recommended value |
| --------------------------- | ------------------------------- |
| Name | `HaiToken` |
| Endpoint URL / API Base URL | `https://api.haitoken.ai` |
| API Key | Your HaiToken API key |
| Model | For example `deepseek-v4-flash` |
If `Fetch Models` is available, run it once here as well.
### Step 4: Verify in each target app
After saving, switch between the apps you want to use and confirm that each of them can see and use the same HaiToken configuration.
### Checklist
* The target apps can read the `HaiToken` Provider
* At least one target app can send a normal request and get a normal response
* Switching models does not trigger auth failures or missing-model errors
The actual coverage of `Universal Provider` can vary between versions. If one app still does not read the shared configuration, fall back to `App-specific Provider` for that app.
## Key Configuration Notes
### What should `Endpoint URL` be?
Recommended:
```text theme={null}
https://api.haitoken.ai
```
Not recommended:
```text theme={null}
https://api.haitoken.ai/v1
https://api.haitoken.ai/v1/chat/completions
```
In the default CC Switch mode, `base_url` is treated as a prefix and fixed paths are appended automatically. If you include `/v1` or the full endpoint yourself, the final request path may be duplicated.
### How is the API key sent?
HaiToken uses OpenAI-compatible Bearer authentication:
```http theme={null}
Authorization: Bearer YOUR_API_KEY
```
### How should I select the model?
You have two options:
* Enter the model ID manually
* Use `Fetch Models` to load model IDs from `/v1/models`
If the model list can already be fetched successfully, the endpoint and API key are usually correct.
## When Routing Must Be Enabled
In CC Switch, the answer to whether `Routing / Local Routing` must be enabled is not the same for every tool. Use the following rule of thumb.
### Cases that clearly require routing
#### Codex using Chat Completions or non-GPT models
If your Codex upstream uses OpenAI Chat Completions, or if you are using third-party models that Codex does not natively assume, such as `DeepSeek`, `Kimi`, `GLM`, or `MiniMax`, routing should be enabled.
This is because CC Switch usually needs local protocol conversion, model mapping, or request forwarding in those cases.
#### Claude / Claude Code / Claude Desktop using non-default protocol formats
If you configure Claude-family tools with:
* `OpenAI Chat Completions`
* `OpenAI Responses API`
instead of the default Anthropic Messages format, you also need routing or proxy-based protocol conversion.
### Cases where routing should be checked first
#### OpenClaw: confirm routing in 3 steps
If your target tool is `OpenClaw`, check routing in this order:
1. Confirm the `HaiToken` Provider was saved and activated.
2. Confirm the OpenClaw-related **Routing** setting is enabled.
3. Send another test request and confirm traffic really goes through HaiToken.
If routing is not enabled, you may see situations such as:
* The Provider is saved successfully
* The model list can still be fetched
* But real requests do not go through HaiToken as expected
* Or switching Providers still does not seem to affect OpenClaw
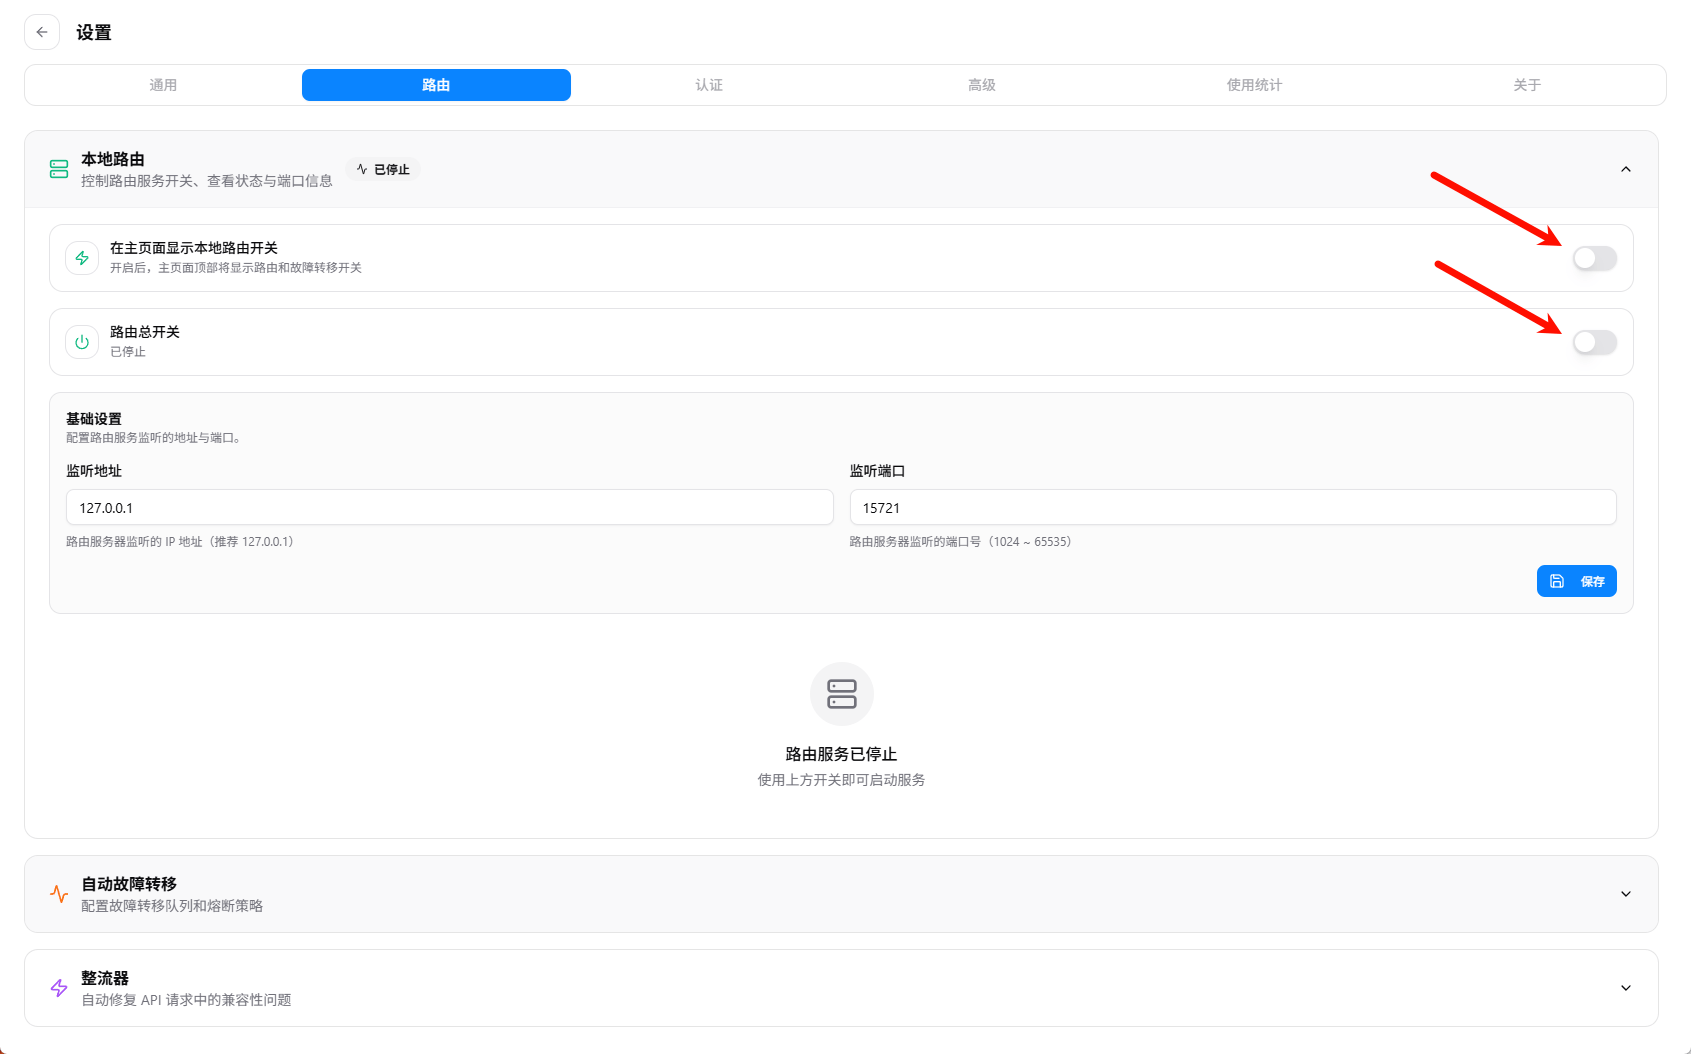 For the OpenClaw scenario, it is safer to check routing once after switching to the `HaiToken` Provider and before sending your next test request.
### Cases that should not be documented as always requiring routing
For tools such as `OpenCode`, `Gemini`, or `Hermes`, if you are already using a standard compatible flow, the docs should not claim that routing is always mandatory. Use the current UI, Provider type, and actual request behavior as your real source of truth.
## Next
* See [Get API Key](/docs/en/quickstart/get-api-key)
* See [OpenAI format API](/docs/en/api-reference/chat/openai-format)
* See [List models](/docs/en/api-reference/models/list-models)
For the OpenClaw scenario, it is safer to check routing once after switching to the `HaiToken` Provider and before sending your next test request.
### Cases that should not be documented as always requiring routing
For tools such as `OpenCode`, `Gemini`, or `Hermes`, if you are already using a standard compatible flow, the docs should not claim that routing is always mandatory. Use the current UI, Provider type, and actual request behavior as your real source of truth.
## Next
* See [Get API Key](/docs/en/quickstart/get-api-key)
* See [OpenAI format API](/docs/en/api-reference/chat/openai-format)
* See [List models](/docs/en/api-reference/models/list-models)